How to Find the Center of a Dilation: A Step-by-Step Guide

- Understanding Dilation: What Is It and Why Is the Center Important?
- Step-by-Step Guide: How to Find the Center of a Dilation
- Common Mistakes When Locating the Center of a Dilation
- Real-World Applications of Finding the Center of a Dilation
- Additional Resources and Tools for Mastering Dilation Concepts
Understanding Dilation: What Is It and Why Is the Center Important?
Dilation is a fundamental concept in geometry, referring to the transformation that alters the size of a figure while maintaining its shape. This transformation involves a scale factor, which determines how much larger or smaller the figure will become. One crucial aspect of dilation is the center of dilation, which serves as the fixed point around which the transformation occurs. Understanding both dilation and its center is essential for various applications in mathematics, art, and even real-world scenarios like architecture and design.
What is the Center of Dilation?
The center of dilation is a specific point in the coordinate plane that acts as a reference for the transformation. When a figure is dilated, every point on that figure moves away from or towards the center of dilation, depending on the scale factor. For example, if the scale factor is greater than one, points will move away from the center, resulting in an enlarged figure. Conversely, if the scale factor is between zero and one, points will move closer to the center, leading to a reduced figure. This property of dilation emphasizes the importance of the center, as it directly influences the outcome of the transformation.
Why is the Center Important?
The significance of the center of dilation cannot be overstated. It provides a reference point that ensures the shape maintains its proportions during the transformation. When the center is correctly identified, the resulting figure will be similar to the original, preserving angles and the ratio of corresponding sides. This preservation of similarity is crucial in various fields, including:
- Architecture: Ensuring scale models accurately represent structures.
- Graphic Design: Maintaining proportionality in visual compositions.
- Engineering: Scaling components for prototypes and simulations.
Additionally, the center of dilation plays a role in understanding more complex transformations and their properties, such as reflections and rotations. By mastering dilation and the importance of its center, one can enhance their geometric intuition and problem-solving skills, making it an essential topic for students and professionals alike.
Step-by-Step Guide: How to Find the Center of a Dilation
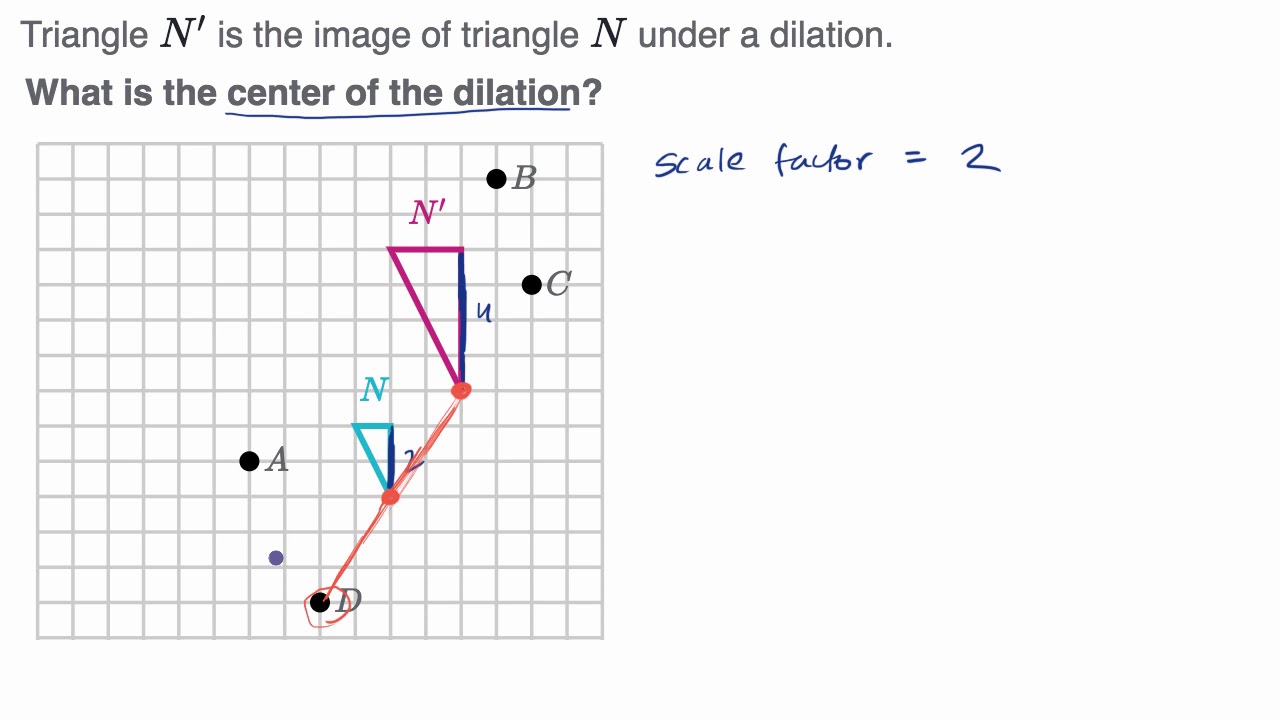
Finding the center of a dilation is a crucial skill in geometry, especially when working with transformations. A dilation is a transformation that alters the size of a figure but maintains its shape, and understanding how to identify the center of this transformation is essential. Follow these steps to accurately find the center of a dilation.
Step 1: Identify the Original and Dilated Figures
To begin, clearly identify the original figure (pre-image) and the dilated figure (image). It’s important to have both figures represented on a coordinate plane or in a geometric diagram. Mark key points on both figures, as these will be used in the calculations.
Step 2: Choose Corresponding Points
Next, select a pair of corresponding points from the original and dilated figures. For example, if point A corresponds to point A, you will use these points to help find the center. Make sure to choose points that are easy to work with, ideally those that are far apart, to minimize calculation errors.
Step 3: Apply the Dilation Formula
To find the center of dilation, apply the dilation formula. The center of dilation (C) can be found using the following formula for the coordinates of the center:
- Cx = (Ax - k * Ax) / (1 - k)
- Cy = (Ay - k * Ay) / (1 - k)
Here, (Ax, Ay) are the coordinates of the original point, (Ax, Ay) are the coordinates of the dilated point, and k is the scale factor of the dilation. By substituting the appropriate values into this formula, you can calculate the coordinates of the center of dilation.
Step 4: Verify Your Result
Once you have calculated the center of dilation, it’s important to verify your result. You can do this by checking if the distances from the center to the original points and the dilated points are proportional to the scale factor. If they are, you have successfully found the center of dilation. If not, recheck your calculations to ensure accuracy.
Common Mistakes When Locating the Center of a Dilation
When working with dilations in geometry, identifying the center of dilation is crucial for accurate transformations. However, many students and even experienced individuals often make common mistakes that can lead to incorrect conclusions. Understanding these pitfalls can help improve accuracy and confidence in geometric transformations.
One prevalent mistake is misidentifying the reference points. The center of dilation should be determined based on the relationship between the original figure and its dilated image. Often, individuals may mistakenly select a point that is not equidistant from corresponding points of the original and the dilated figure. To avoid this error, ensure that you are using the correct pairs of corresponding points and measuring their distances accurately.
Another common error involves overlooking the scale factor. The scale factor determines how much larger or smaller the dilated image will be compared to the original. If a person fails to apply the scale factor correctly, they may misplace the center of dilation. It is essential to remember that the distances from the center to the original points and the dilated points must adhere to the scale factor ratio. Always double-check calculations to ensure the scale factor is applied properly.
Additionally, not using a straightedge or ruler can lead to inaccuracies when locating the center of dilation. Relying solely on freehand drawing can result in skewed measurements. It is advisable to use appropriate tools to ensure precision. Drawing accurate lines through corresponding points will help to visually identify the center of dilation more effectively. Avoiding these common mistakes will enhance your understanding and execution of dilations in geometric transformations.
Real-World Applications of Finding the Center of a Dilation
Finding the center of a dilation has practical applications across various fields, including art, architecture, and even technology. Understanding how to determine the center point allows for accurate scaling of images and structures, ensuring that proportions are maintained while adjusting size. This concept is particularly vital in graphic design, where artists often need to enlarge or reduce images without distorting the original proportions. By pinpointing the center of dilation, designers can create visually appealing and proportionate artworks that meet specific project requirements.
In architecture and urban planning, the center of a dilation plays a crucial role in creating blueprints and models. When scaling up architectural designs, it is essential to maintain the correct dimensions and angles to ensure the structural integrity of buildings. Architects use dilation techniques to create accurate representations of their designs, allowing for precise construction and minimizing errors. By identifying the center of dilation, architects can efficiently produce scaled models that reflect the intended final product, facilitating better communication with clients and contractors.
In technology, particularly in computer graphics and animation, finding the center of a dilation is fundamental for rendering 3D objects. When animators need to resize objects in a scene, they rely on dilation to maintain the correct perspective and proportions. This technique is essential for creating realistic animations and virtual environments, where the accurate representation of objects enhances the viewers experience. By applying dilation principles, animators can ensure that all elements within a scene interact harmoniously, contributing to the overall aesthetic quality of the animation.
Education also benefits from understanding dilation and its center, as it forms a foundational concept in geometry. Teachers utilize real-world examples to illustrate how dilation applies to everyday situations, making the learning process more relatable for students. Whether it’s in creating maps, scaling images for presentations, or designing graphics for social media, recognizing the significance of finding the center of a dilation empowers students with practical skills that extend beyond the classroom.
Additional Resources and Tools for Mastering Dilation Concepts
When it comes to mastering the concept of dilation in mathematics, having access to the right resources can make all the difference. Whether you are a student, educator, or a parent helping with homework, leveraging these tools can enhance understanding and retention of the material. Below are some valuable resources and tools designed to help you grasp dilation concepts more effectively.
Online Learning Platforms
Many online platforms offer comprehensive courses and tutorials focused on dilation and related geometric concepts. Some popular options include:
- Khan Academy: Provides video lessons and practice exercises tailored to various skill levels.
- Coursera: Offers courses from universities that cover geometry topics, including dilation.
- edX: Features courses designed to deepen your understanding of geometric transformations.
Interactive Geometry Software
Utilizing interactive geometry software can be an effective way to visualize dilation. Programs like GeoGebra and Desmos allow users to manipulate shapes and see the effects of dilation in real-time. These tools provide an engaging way to experiment with different scale factors and centers of dilation, making abstract concepts more concrete.
Books and Study Guides
For those who prefer traditional learning methods, several books and study guides focus on geometry and dilation. Look for titles that include exercises and step-by-step explanations. Some recommended resources include:
- “Geometry For Dummies” - A comprehensive guide that breaks down complex concepts into easy-to-understand language.
- “Geometry: A Comprehensive Course” - Offers in-depth coverage of geometric principles, including dilation.
Incorporating these additional resources and tools into your study routine can greatly enhance your understanding of dilation concepts. With a mix of interactive software, online courses, and literature, learners can find the method that works best for them.
Did you find this article helpful? How to Find the Center of a Dilation: A Step-by-Step Guide See more here General.
Leave a Reply


Related posts